Quick start
Install in Blender
Clone the repository (or download it as a ZIP from GitHub and unpack it):
git clone https://github.com/mmaciejak/Blendmentation
Then, in Blender's Scripting tab, add the cloned folder (the one that contains
blendmentation/) to sys.path. All the examples below start with these lines:
import sys
sys.path.append("/path/to/Blendmentation")  # the cloned folder

import bpy
from blendmentation import augmentations as aug
from blendmentation import export
from blendmentation import generating as gen
from blendmentation import state
Or install it as a Blender add-on: download blendmentation-addon-<version>.zip from the
latest release, then
Edit > Preferences > Add-ons > Install from Disk, and
enable "Blendmentation". Scripts then import it without the two sys.path lines, and the
node editor gets a tool that writes Node augmentations for you (see
A smart material).
To install it with pip, or to use Blender as a Python module, see Installation.
For writing these scripts in Blender's Text Editor,
Blender Autocomplete is useful: it adds
code completion with the docstrings of bpy and of installed modules like Blendmentation.
Chained transform augmentations
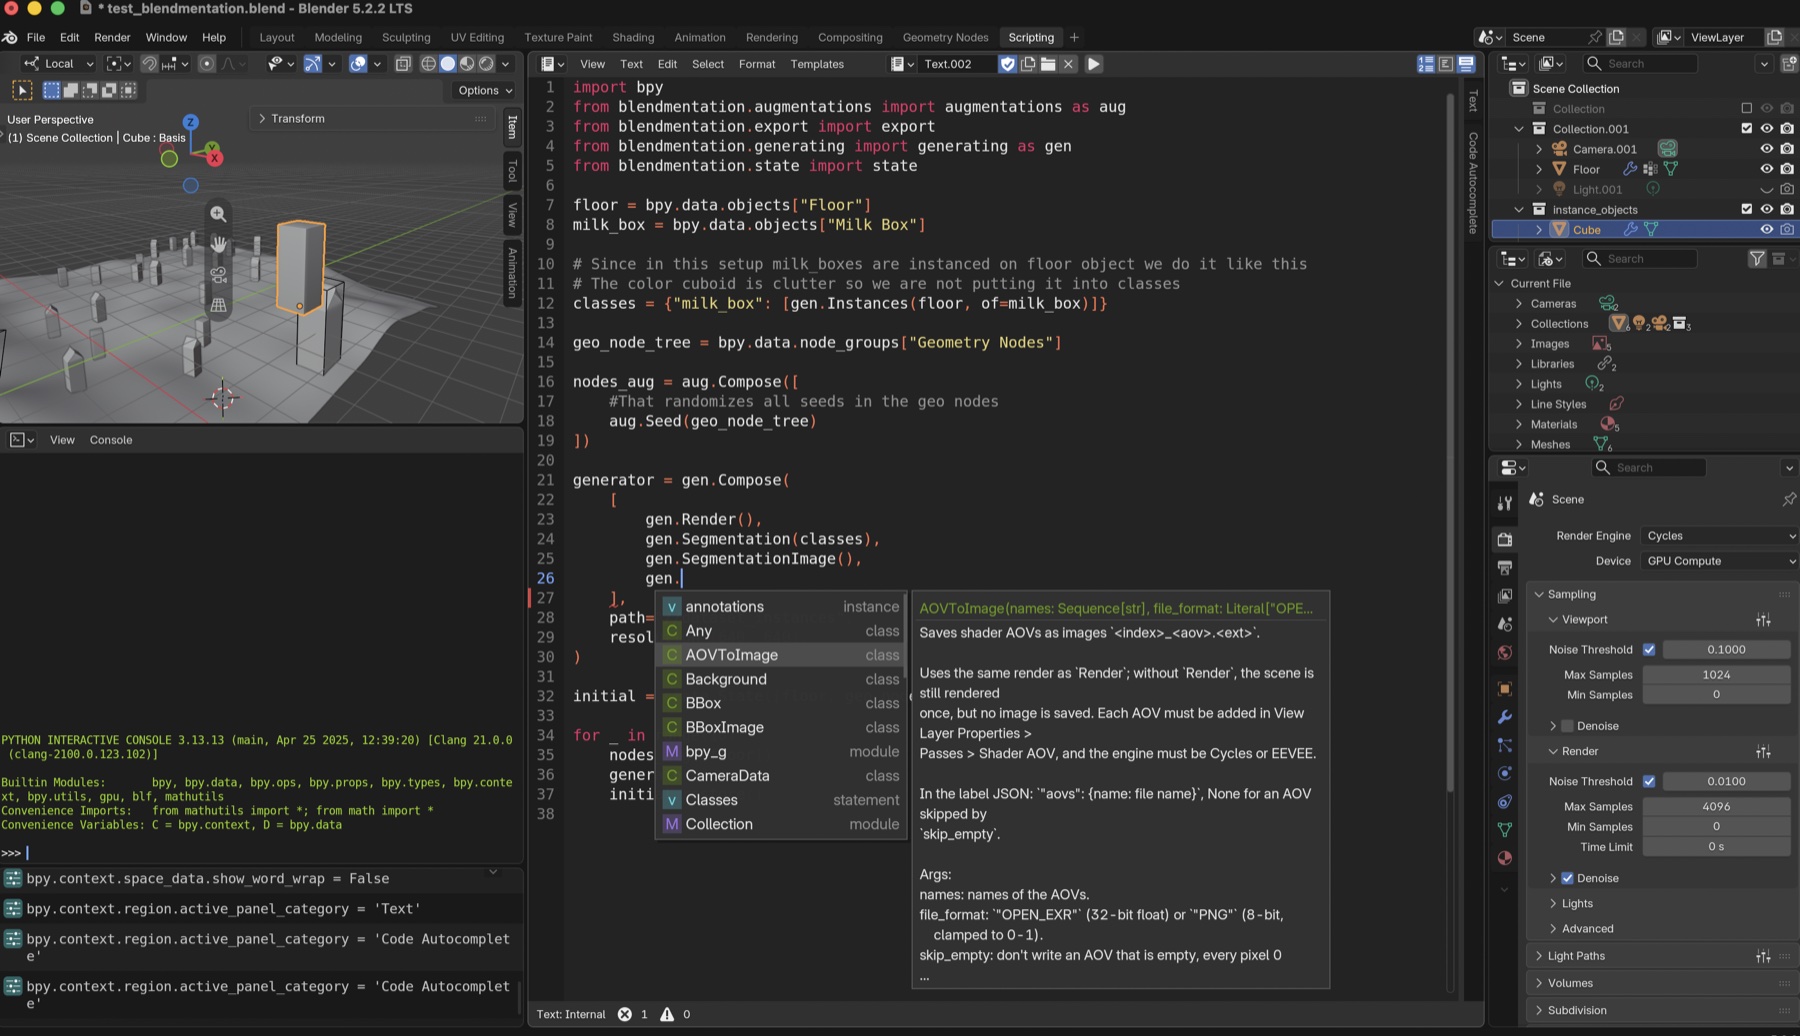
The scene has a milk carton "Milk Box" standing on a floor "Floor", with its rotation at (0, 0, 0).
The most basic augmentations are transforms. You can create a Compose with them like
this. Here a milk carton standing on its base gets a random heading and position.
milk_box = bpy.data.objects["Milk Box"]

# standing on its base: any heading, moved on the floor
standing_aug = aug.Compose([
    aug.Rotation(z=180),
    aug.Translation(x=0.5, y=0.5),
])
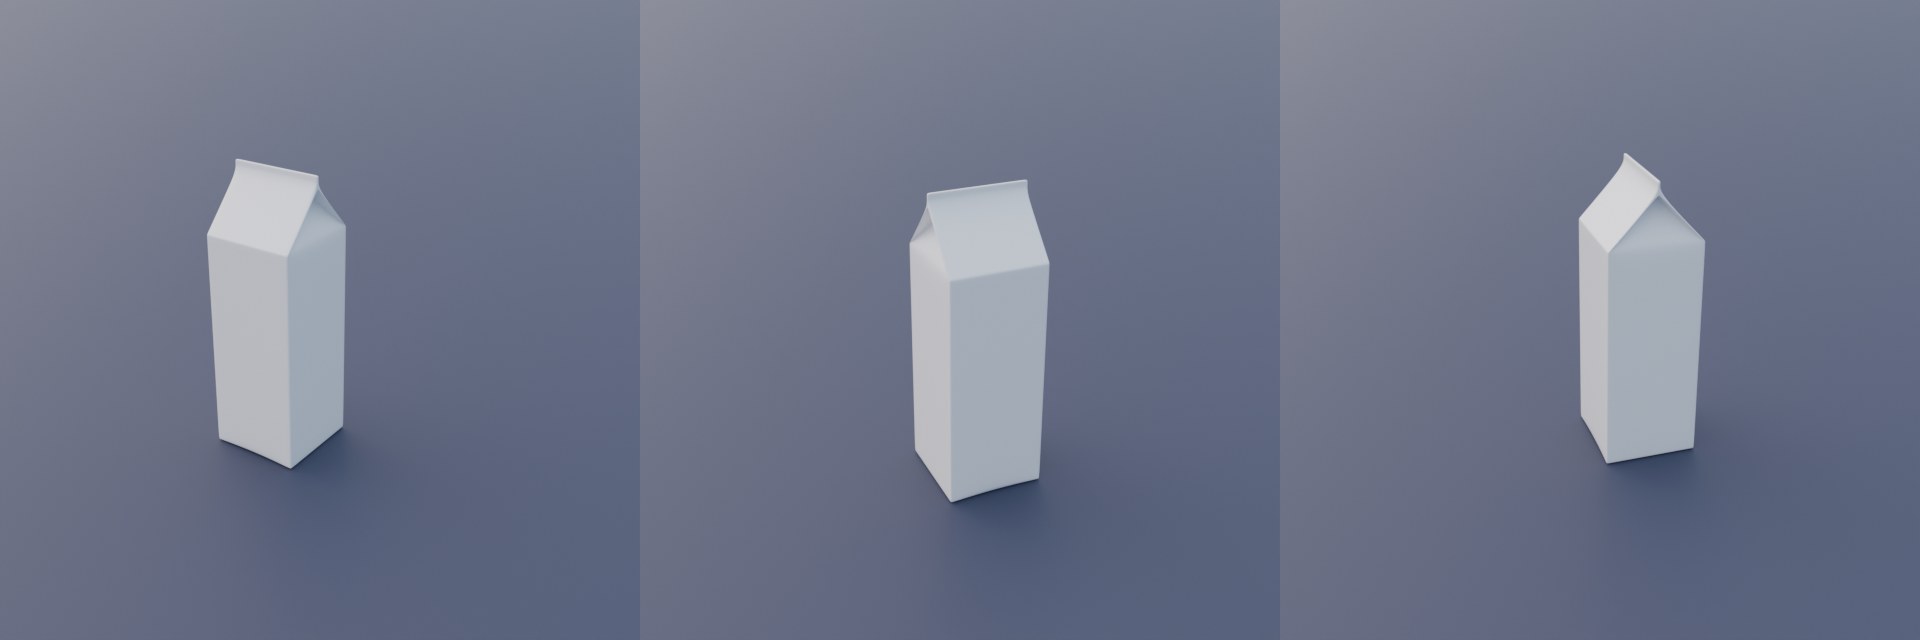
The transforms change the object from where it is, so a single number v is the range
(-v, v): Rotation(z=180) turns it by -180 to 180 degrees and Translation(x=0.5)
moves it by up to 0.5 either way. (low, high) gives the range itself. Augmentations
that set a value instead, like FocalLength(50) or LookAt(target, distance=8), take a
single number as that exact value.
You can also control the chance of the whole Compose happening with p.
milk_box = bpy.data.objects["Milk Box"]

# standing on its base: any heading, moved on the floor
standing_aug = aug.Compose([
    aug.Rotation(z=180),
    aug.Translation(x=0.5, y=0.5),
], p=0.8)
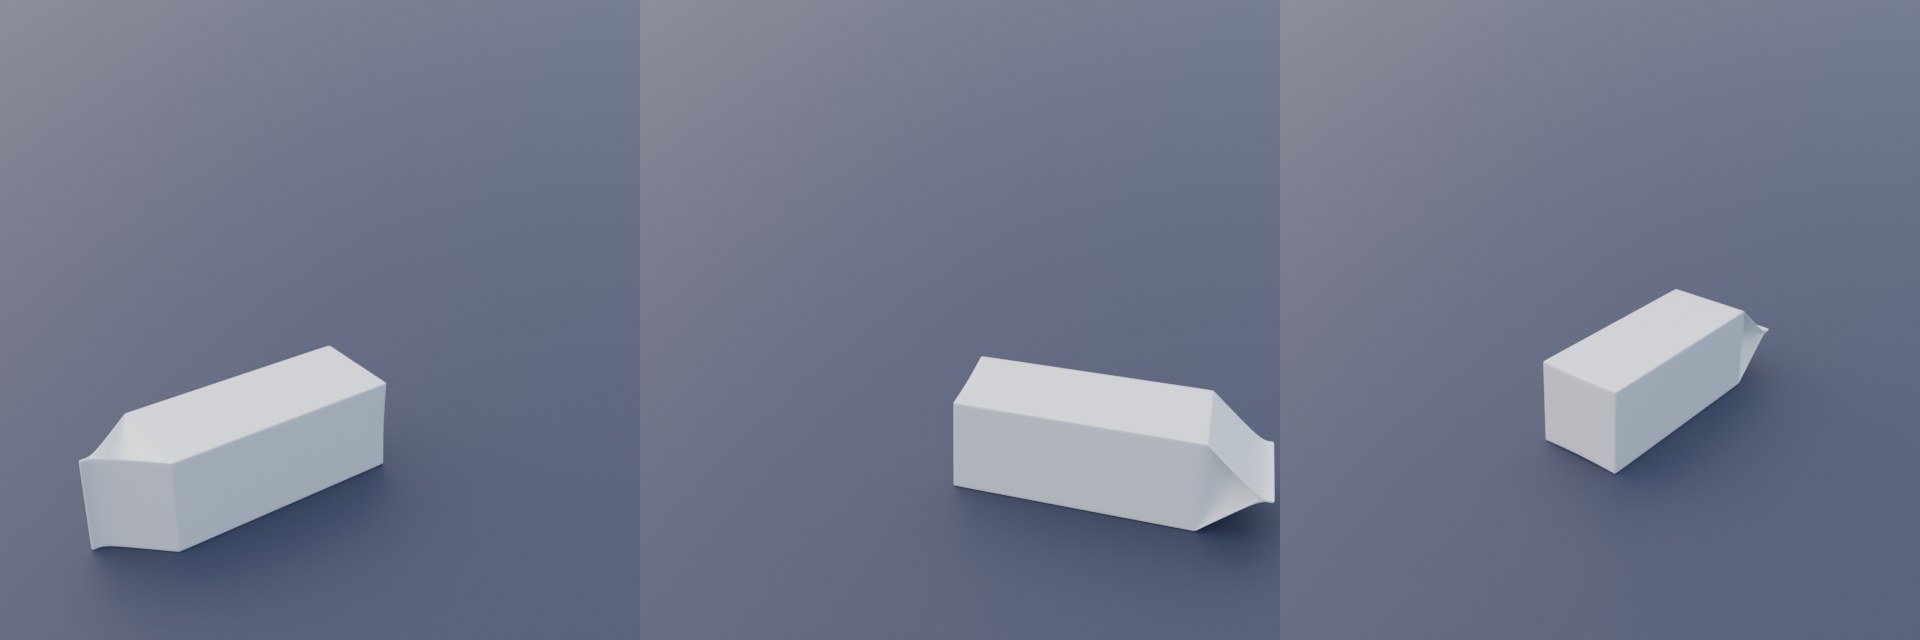
Let's imagine that in our case we want about 80% of the datapoints with the milk carton
standing up, and about 20% with it lying on its side. Here is a second Compose for
that. A single Rotation tips the carton over around X and picks the side it lies on
with a stepped Y rotation, which turns it around its long axis. PlaceOn, after the
transforms, moves it up or down until it rests on the floor, wherever its origin is.
milk_box = bpy.data.objects["Milk Box"]
floor = bpy.data.objects["Floor"]

# standing on its base: any heading, moved on the floor
standing_aug = aug.Compose([
    aug.Rotation(z=180),
    aug.Translation(x=0.5, y=0.5),
], p=0.8)

# lying on one of its four sides
lying_aug = aug.Compose([
    # tipped over around X, turned around its long axis in 90 degree
    # steps (which side is down), any heading
    aug.Rotation(x=(90, 90), y=(0, 270, 90), z=180),
    aug.Translation(x=0.5, y=0.5),
    # after the transforms: sets it down on the floor
    aug.PlaceOn(floor),
])
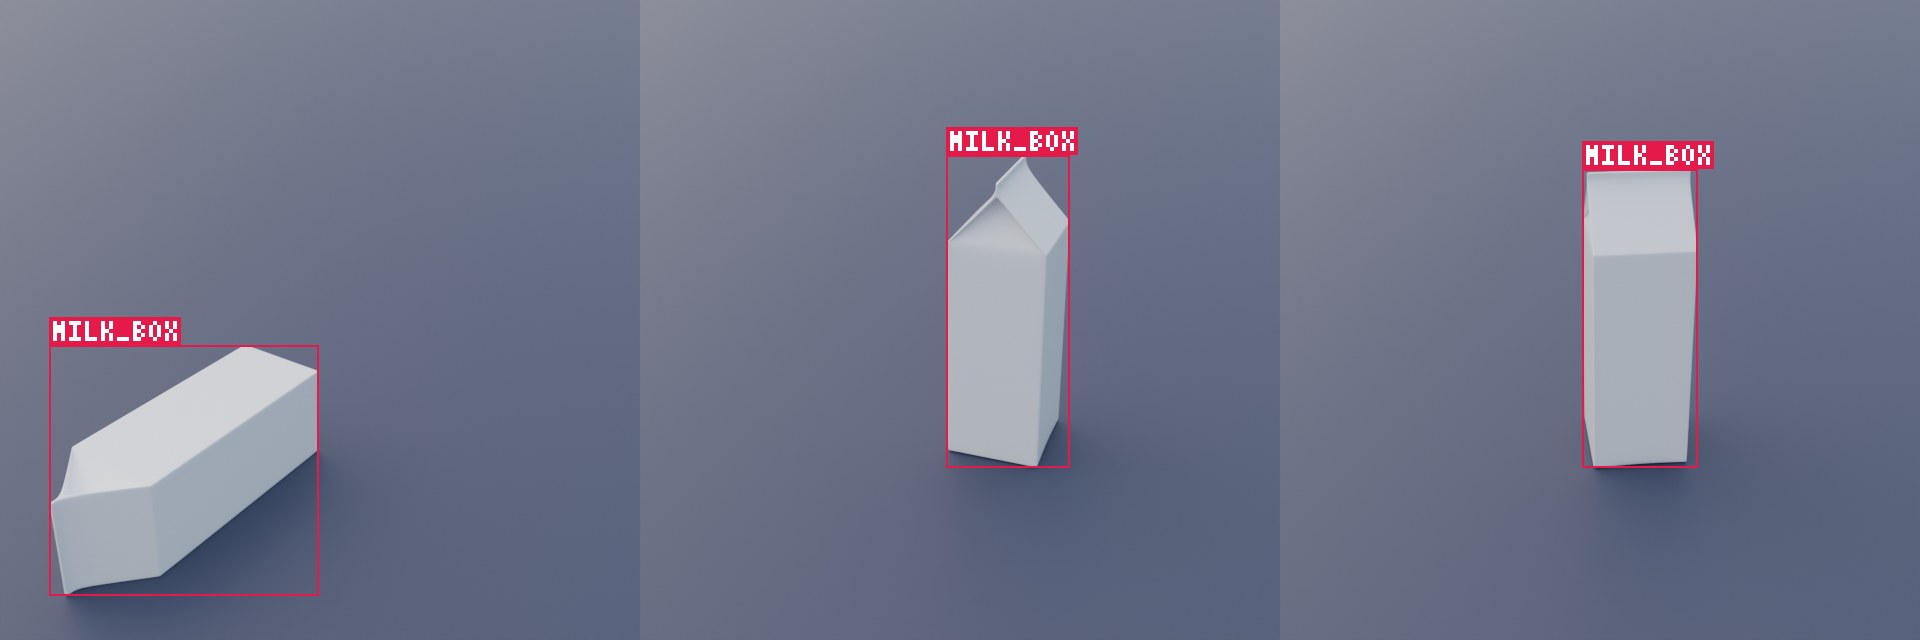
Then add a generating Compose with simple bounding boxes, and BBoxImage, a copy of
the image with the boxes drawn on it.
milk_box = bpy.data.objects["Milk Box"]
floor = bpy.data.objects["Floor"]

# standing on its base: any heading, moved on the floor
standing_aug = aug.Compose([
    aug.Rotation(z=180),
    aug.Translation(x=0.5, y=0.5),
], p=0.8)

# lying on one of its four sides
lying_aug = aug.Compose([
    # tipped over around X, turned around its long axis in 90 degree
    # steps (which side is down), any heading
    aug.Rotation(x=(90, 90), y=(0, 270, 90), z=180),
    aug.Translation(x=0.5, y=0.5),
    # after the transforms: sets it down on the floor
    aug.PlaceOn(floor),
])

generator = gen.Compose(
    [
        gen.Render(),
        gen.BBox({"milk_box": [milk_box]}),
        # a copy of the image with the boxes drawn, to check them
        gen.BBoxImage(),
    ],
    path="//dataset",
    resolution=(640, 480),
)
And finally, create the pipeline. Everything the augmentations change inside
with state.restoring(): is set back when the block ends, so every datapoint starts from
the scene as you built it. It uses the lying-down augmentation only when the standing one
didn't happen: applied tells whether the last call of a Compose ran.
milk_box = bpy.data.objects["Milk Box"]
floor = bpy.data.objects["Floor"]

# standing on its base: any heading, moved on the floor
standing_aug = aug.Compose([
    aug.Rotation(z=180),
    aug.Translation(x=0.5, y=0.5),
], p=0.8)

# lying on one of its four sides
lying_aug = aug.Compose([
    # tipped over around X, turned around its long axis in 90 degree
    # steps (which side is down), any heading
    aug.Rotation(x=(90, 90), y=(0, 270, 90), z=180),
    aug.Translation(x=0.5, y=0.5),
    # after the transforms: sets it down on the floor
    aug.PlaceOn(floor),
])

generator = gen.Compose(
    [
        gen.Render(),
        gen.BBox({"milk_box": [milk_box]}),
        # a copy of the image with the boxes drawn, to check them
        gen.BBoxImage(),
    ],
    path="//dataset",
    resolution=(640, 480),
)

for _ in range(100):
    # everything changed inside is set back afterwards
    with state.restoring():
        standing_aug([milk_box])
        # the 20% where it isn't standing
        if not standing_aug.applied:
            lying_aug([milk_box])
        generator()
The same with OneOf
OneOf picks one augmentation from a list by weight, so the choice between standing
and lying can be a single Compose. Only the rotations differ; the translation and
PlaceOn follow them (a standing carton stays on the floor).
carton_aug = aug.Compose([
    aug.OneOf(
        [
            # standing on its base: any heading
            aug.Rotation(z=180),
            # lying on one of its four sides
            aug.Rotation(x=(90, 90), y=(0, 270, 90), z=180),
        ],
        # standing 80% of the time
        weights=[8, 2],
    ),
    aug.Translation(x=0.5, y=0.5),
    # after the transforms: sets it down on the floor
    aug.PlaceOn(floor),
])

for _ in range(100):
    with state.restoring():
        carton_aug([milk_box])
        generator()
Checking the augmentations
Two pages show what a pipeline does with its augmentations: a preview of what they can do, before generating, and a report of what the dataset got, after it. Both are HTML files that open in any browser, without internet.
Before generating
The milk carton from above, as one Compose with a OneOf. A name on an augmentation
is optional; the pages show it in place of the class name. aug.graph_preview draws the
augmentations to dataset/augmentations_preview.html:
milk_box = bpy.data.objects["Milk Box"]
floor = bpy.data.objects["Floor"]

carton_aug = aug.Compose(
    [
        aug.OneOf(
            [
                aug.Rotation(z=180, name="standing"),
                aug.Rotation(x=(90, 90), y=(0, 270, 90), z=180, name="lying"),
            ],
            weights=[8, 2],
            name="standing or lying",
        ),
        aug.Translation(x=0.5, y=0.5, name="move on the floor"),
        aug.PlaceOn(floor, name="set down"),
    ],
    name="carton",
)

# what the augmentations can do, with which probability;
# show=True opens it in the web browser
aug.graph_preview({"carton": carton_aug}, "//dataset", show=True)
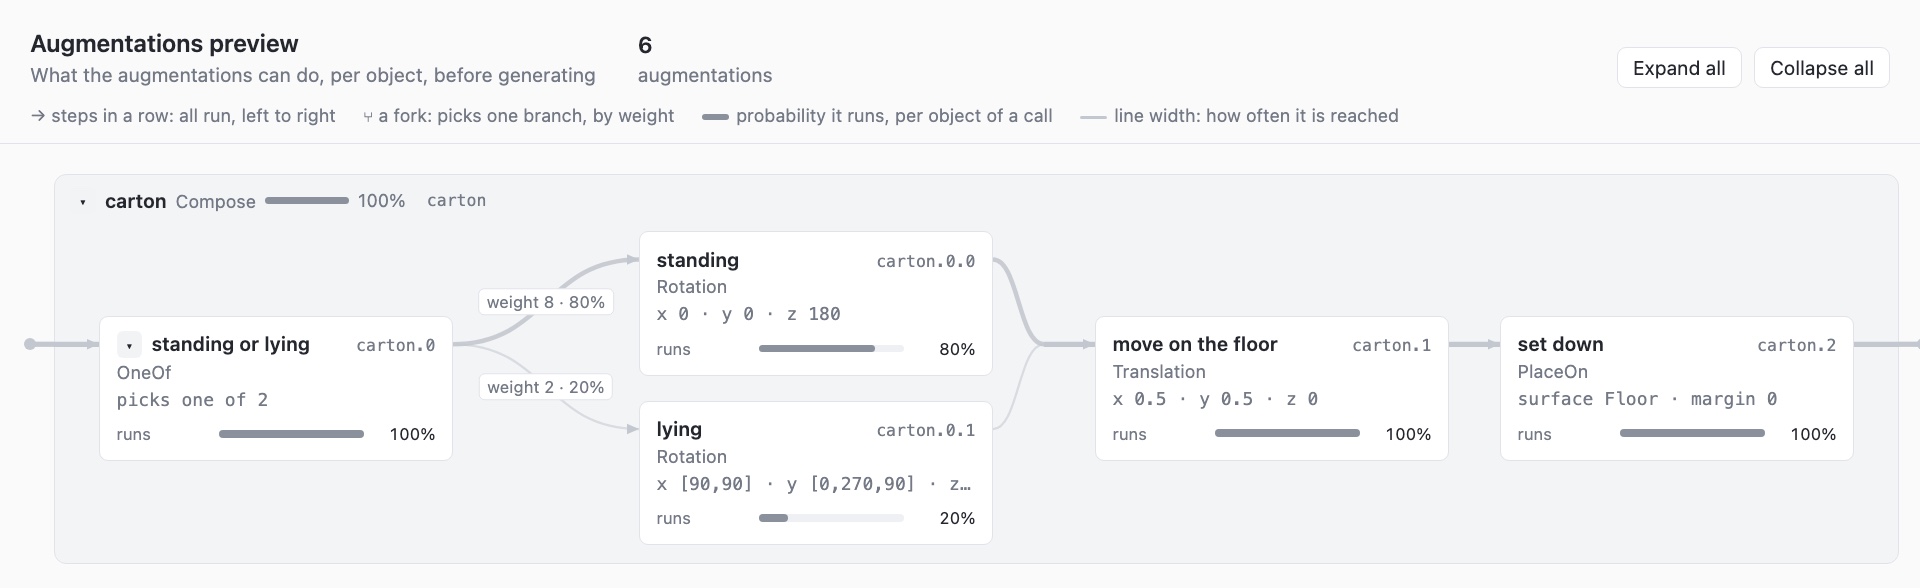
The steps in a frame run left to right, for every object. "standing or lying" is a fork: it picks one branch per object by weight (8 and 2, so 80% and 20%), and the branches join again before "move on the floor", which runs whichever was picked. The bar on each card is the probability that the augmentation runs, and lines are thinner for rarer branches.
After generating
Add the gen.Augmentations step: every label then records what each augmentation did for
each object, and every datapoint BBox skips is written to skipped.jsonl with the
reason. After the loop, export.augmentation_report draws the augmentations again, with
what the dataset got, to dataset/augmentations.html:
milk_box = bpy.data.objects["Milk Box"]
floor = bpy.data.objects["Floor"]

carton_aug = aug.Compose(
    [
        aug.OneOf(
            [
                aug.Rotation(z=180, name="standing"),
                aug.Rotation(x=(90, 90), y=(0, 270, 90), z=180, name="lying"),
            ],
            weights=[8, 2],
            name="standing or lying",
        ),
        aug.Translation(x=0.5, y=0.5, name="move on the floor"),
        aug.PlaceOn(floor, name="set down"),
    ],
    name="carton",
)

# what the augmentations can do, with which probability;
# show=True opens it in the web browser
aug.graph_preview({"carton": carton_aug}, "//dataset", show=True)

generator = gen.Compose(
    [
        gen.Render(),
        # skips the datapoint when over 20% of the box is out of frame
        gen.BBox({"milk_box": [milk_box]}, max_truncation=0.2),
        # what each augmentation did, in every label
        gen.Augmentations({"carton": carton_aug}),
    ],
    path="//dataset",
    resolution=(640, 480),
)

for _ in range(100):
    with state.restoring():
        carton_aug([milk_box])
        generator()

# what the dataset got, against the graph: dataset/augmentations.html
export.augmentation_report("//dataset")
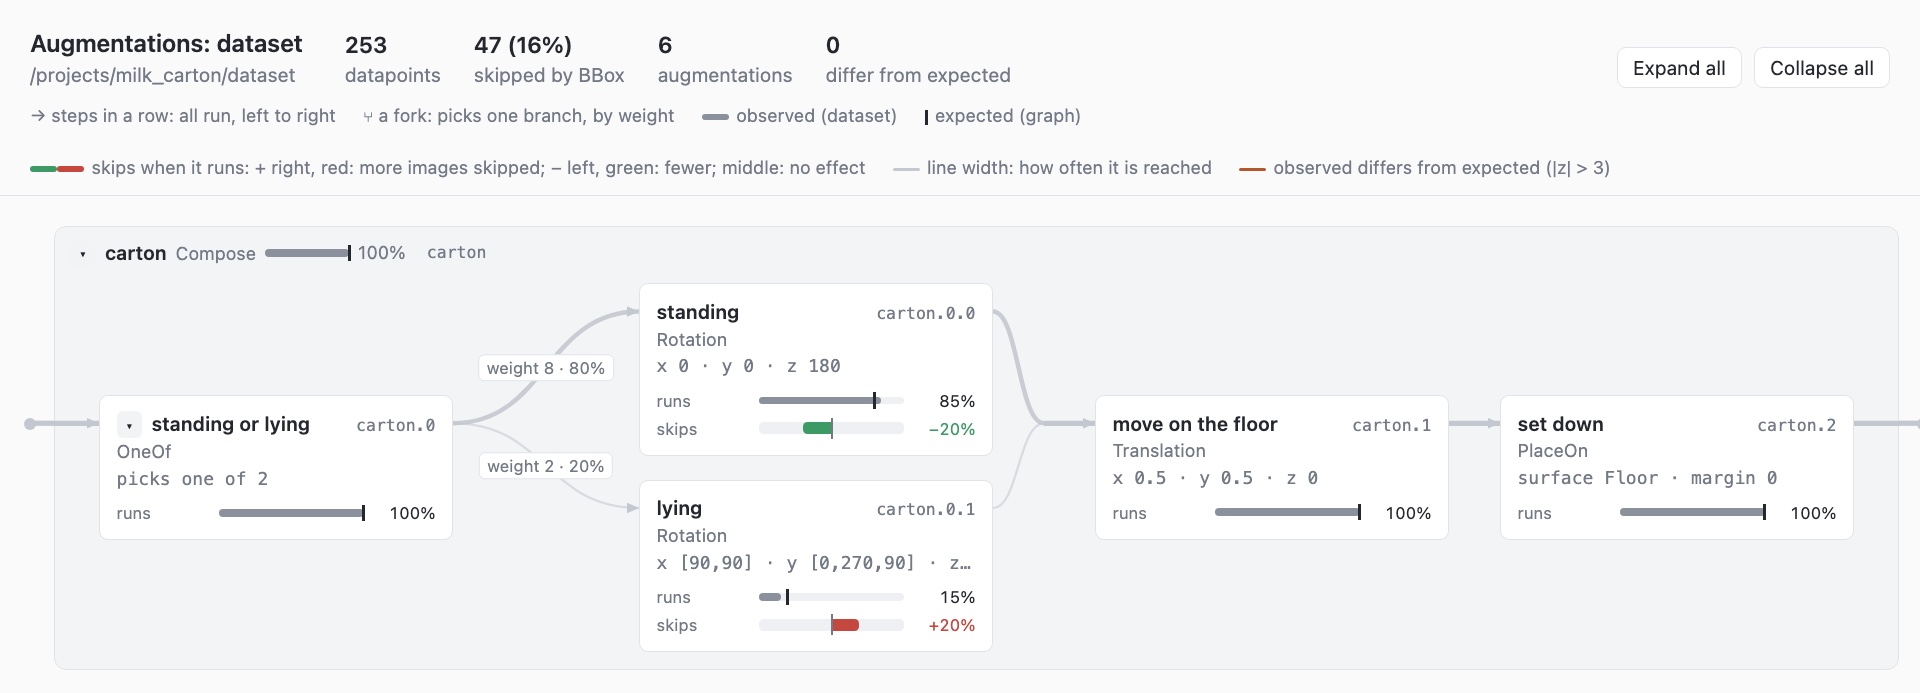
The grey bars are what the dataset got, and the ticks what the preview expected. Here
BBox skipped 47 of the 300 datapoints (click the number for the reasons, here all cut by
the frame). A lying carton is wider, so the frame cuts it more often: its skips bar is red,
to the right, at +20% (images were skipped 20 points more often when it lay), standing's is
green, to the left, and the dataset has 15% lying cartons instead of 20%. A difference larger than chance is marked in orange.
export.augmentation_stats(path) and export.skip_stats(path) give the same numbers in
Python.
Augmenting a material with shader nodes
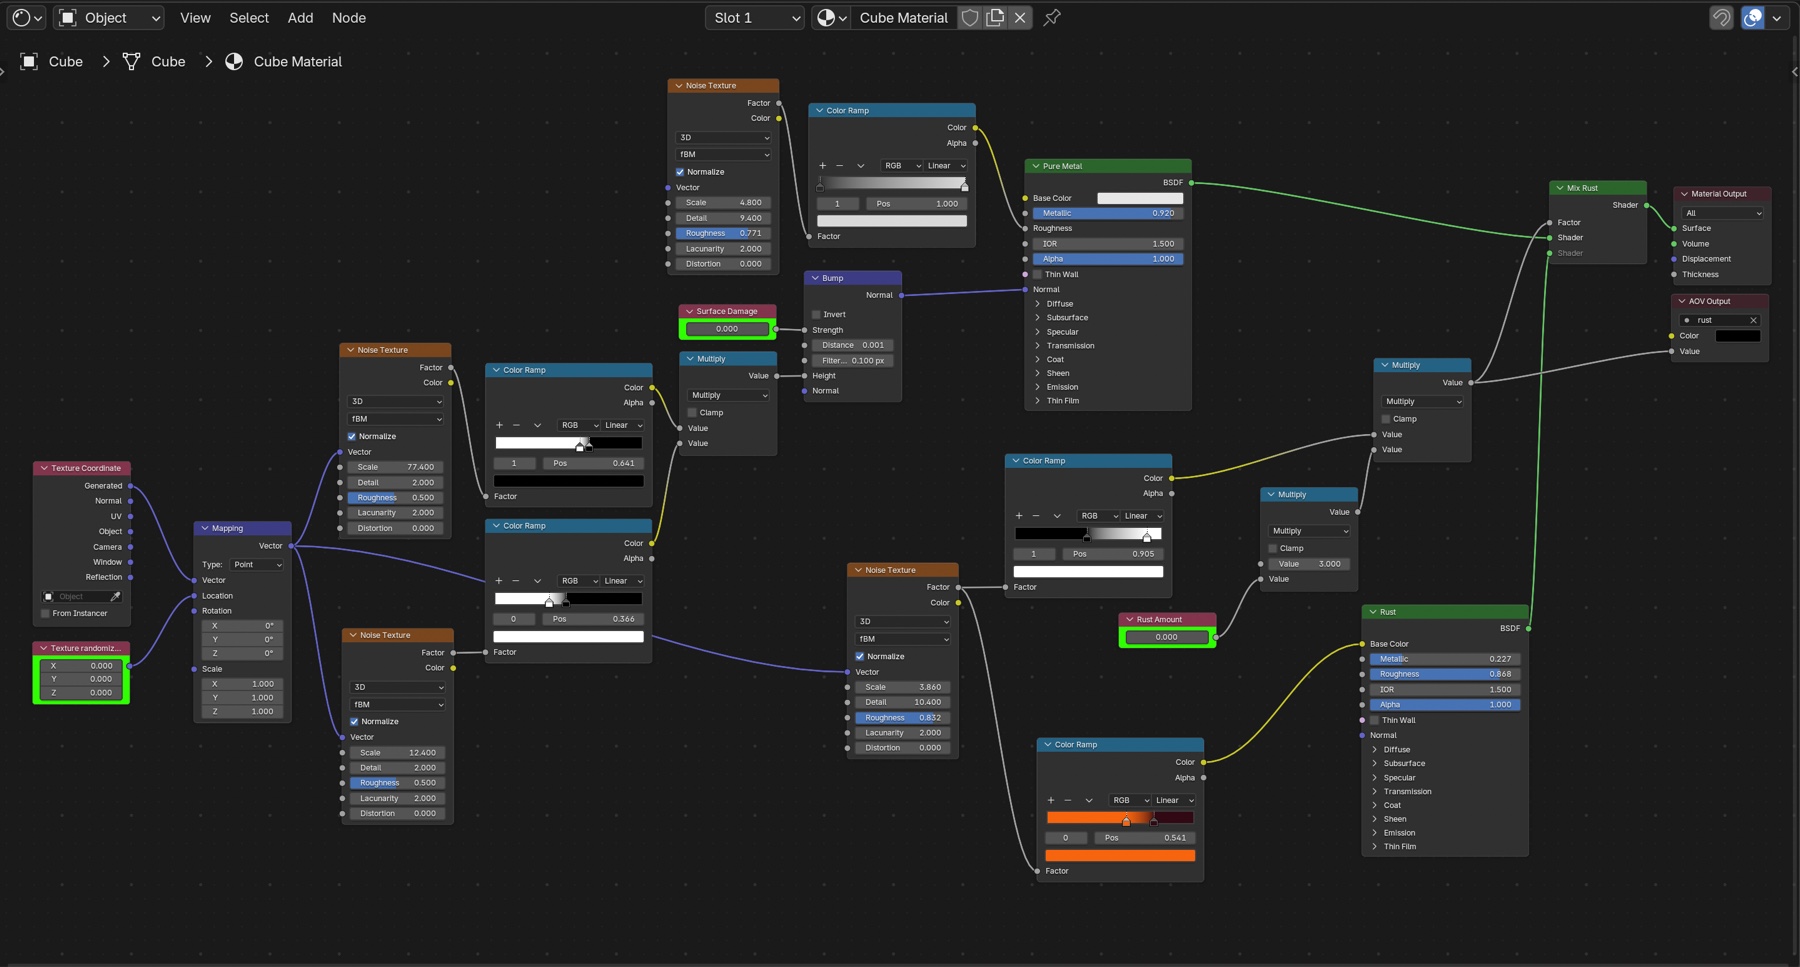
With Vector you can randomize a procedural material between datapoints. Here a Vector
node "Texture randomization" moves the Mapping of all the material's textures (a Vector
node in shader nodes needs Blender 5). A single number pair in value_range is used for
every component, so (-100, 100) is the same as ((-100, -100, -100), (100, 100, 100)).
material = bpy.data.materials["Cube Material"]

# the paths are relative to the material
material_aug = aug.Compose([
    # moves all textures: a random offset on each axis
    aug.Vector(
        'node_tree.nodes["Texture randomization"].vector',
        value_range=(-100, 100),
    ),
])
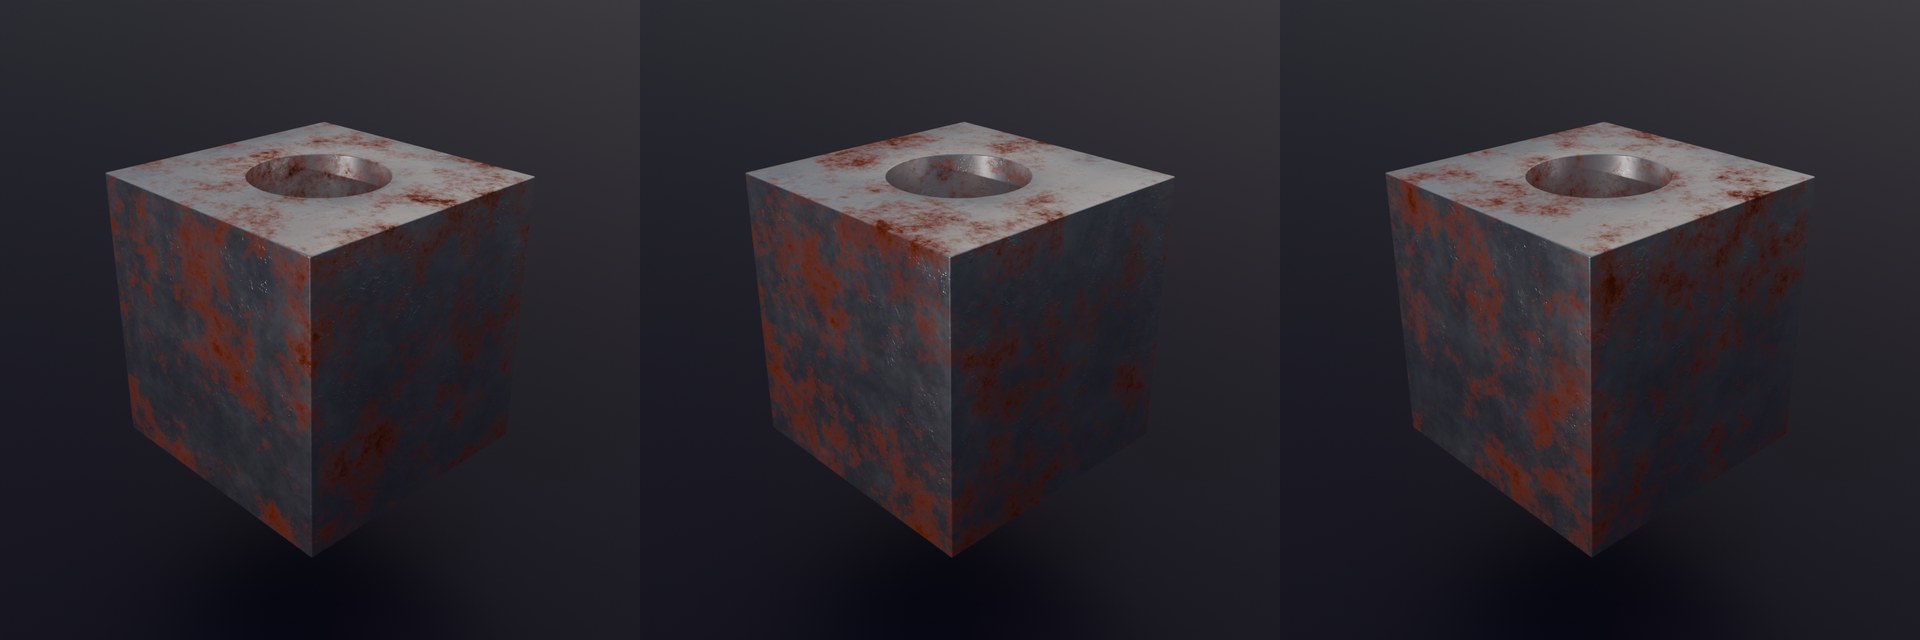
Any other single value, such as a Value node, can be controlled with Number. Here
"Surface Damage" sets the bump strength.
material = bpy.data.materials["Cube Material"]

# the paths are relative to the material
material_aug = aug.Compose([
    # moves all textures: a random offset on each axis
    aug.Vector(
        'node_tree.nodes["Texture randomization"].vector',
        value_range=(-100, 100),
    ),
    # bump strength
    aug.Number(
        'node_tree.nodes["Surface Damage"].outputs[0].default_value',
        value_range=(0, 1),
    ),
])
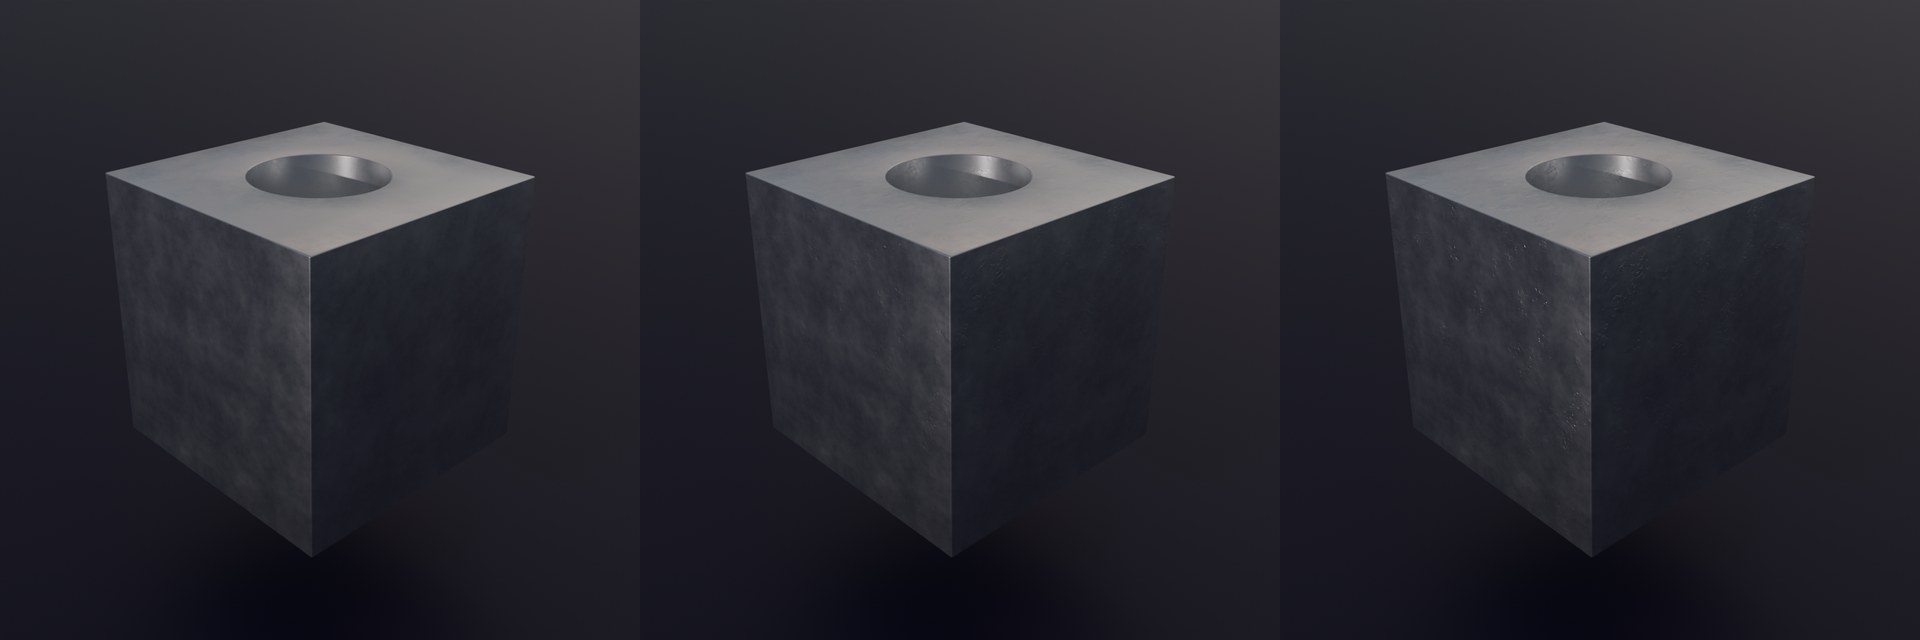
With p you control the probability of an augmentation, here how often rust appears
in the dataset. otherwise is the value set the rest of the time, here no rust; without
it the value stays as it is.
material = bpy.data.materials["Cube Material"]

# the paths are relative to the material
material_aug = aug.Compose([
    # moves all textures: a random offset on each axis
    aug.Vector(
        'node_tree.nodes["Texture randomization"].vector',
        value_range=(-100, 100),
    ),
    # bump strength
    aug.Number(
        'node_tree.nodes["Surface Damage"].outputs[0].default_value',
        value_range=(0, 1),
    ),
    # rust in 20% of the images, clearly visible; none in the others
    aug.Number(
        'node_tree.nodes["Rust Amount"].outputs[0].default_value',
        value_range=(0.5, 1),
        p=0.2,
        otherwise=0,
    ),
])
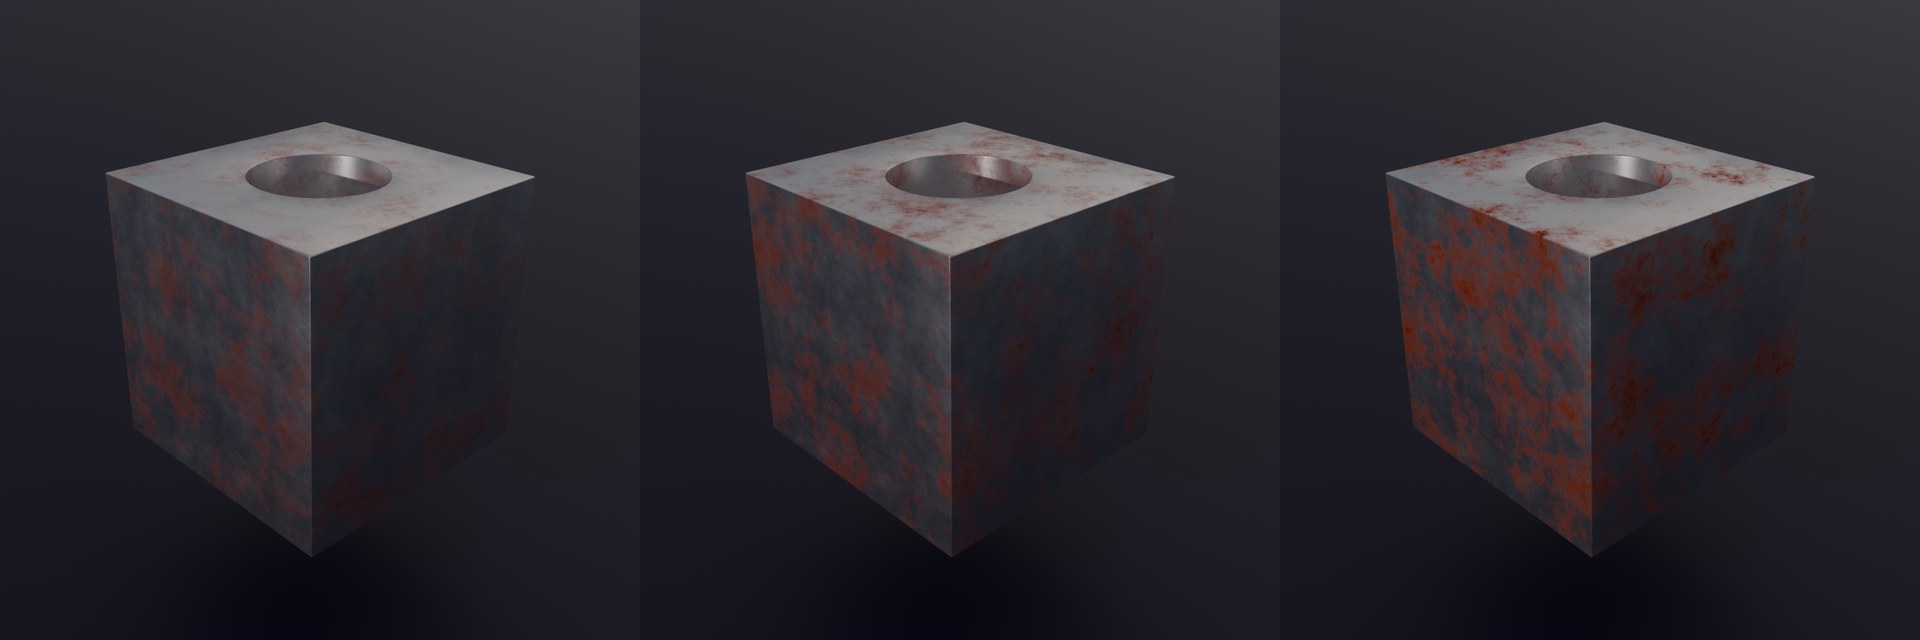
To render the images, and a mask of the rust we just added, we can use a setup like this. The rust factor goes to an AOV Output "rust" (Value), and a Value AOV "rust" is added in View Layer Properties → Passes → Shader AOV. The engine is Cycles or EEVEE.
material = bpy.data.materials["Cube Material"]

# the paths are relative to the material
material_aug = aug.Compose([
    # moves all textures: a random offset on each axis
    aug.Vector(
        'node_tree.nodes["Texture randomization"].vector',
        value_range=(-100, 100),
    ),
    # bump strength
    aug.Number(
        'node_tree.nodes["Surface Damage"].outputs[0].default_value',
        value_range=(0, 1),
    ),
    # rust in 20% of the images, clearly visible; none in the others
    aug.Number(
        'node_tree.nodes["Rust Amount"].outputs[0].default_value',
        value_range=(0.5, 1),
        p=0.2,
        otherwise=0,
    ),
])
generator = gen.Compose(
    [
        gen.Render(),
        # the rust mask; no file when there is no rust
        gen.AOVToImage(["rust"], skip_empty=True),
    ],
    path="//dataset",
    resolution=(640, 480),
)
And now we can generate the images with the rust masks. Each datapoint runs inside
with state.restoring():, which sets the material back afterwards. The label lists each
mask under "aovs", and None for the images without rust.
material = bpy.data.materials["Cube Material"]

# the paths are relative to the material
material_aug = aug.Compose([
    # moves all textures: a random offset on each axis
    aug.Vector(
        'node_tree.nodes["Texture randomization"].vector',
        value_range=(-100, 100),
    ),
    # bump strength
    aug.Number(
        'node_tree.nodes["Surface Damage"].outputs[0].default_value',
        value_range=(0, 1),
    ),
    # rust in 20% of the images, clearly visible; none in the others
    aug.Number(
        'node_tree.nodes["Rust Amount"].outputs[0].default_value',
        value_range=(0.5, 1),
        p=0.2,
        otherwise=0,
    ),
])
generator = gen.Compose(
    [
        gen.Render(),
        # the rust mask; no file when there is no rust
        gen.AOVToImage(["rust"], skip_empty=True),
    ],
    path="//dataset",
    resolution=(640, 480),
)
for _ in range(100):
    # the material is set back afterwards
    with state.restoring():
        material_aug([material])
        generator()
A smart material
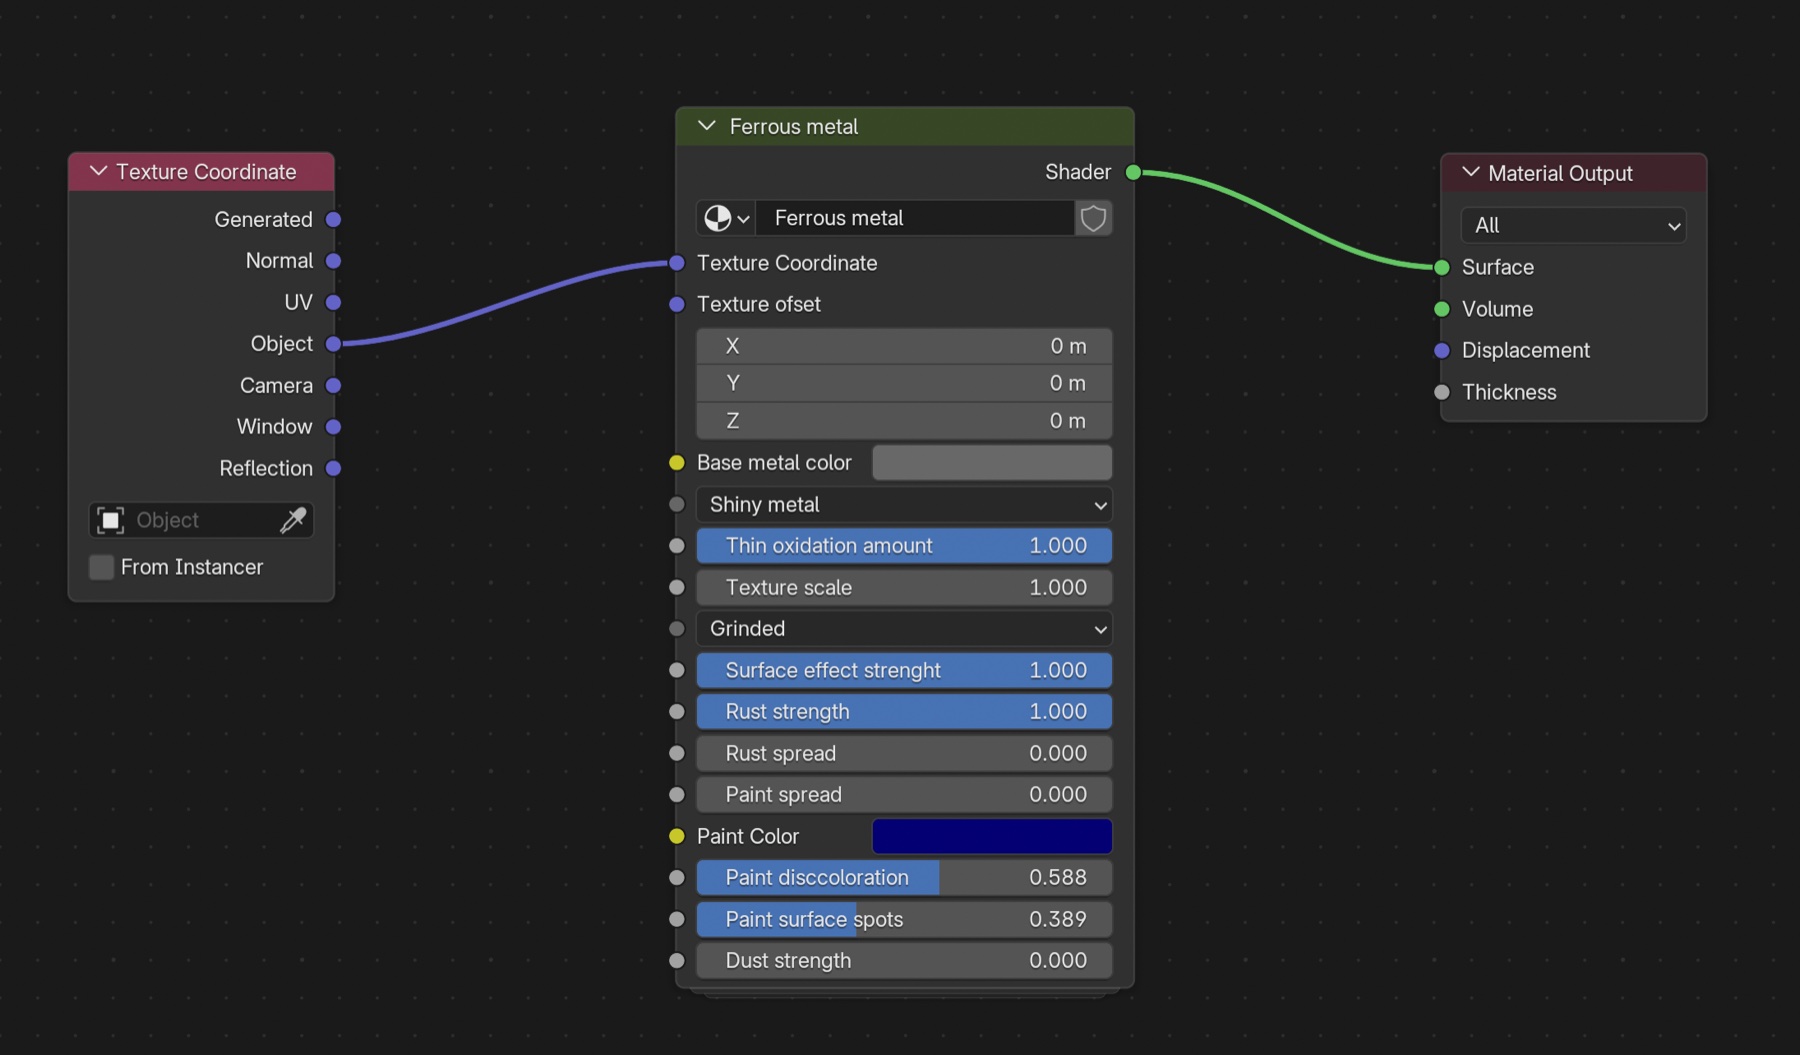
A smart material puts its settings on one group node, here a node of the group "Ferrous
metal" in the material "Master material". Node sets many of its inputs in one
augmentation: each input gets the Number, Vector, Boolean or Menu that fits its
socket, with its range (or menu options) and, if you like, p and otherwise. Leave
their data path out: the Node gives each one the path of its input,
ferrous_metal + '.inputs["Rust strength"].default_value'. A color input is set with
Vector, and its range keeps alpha. Here the bare metal and each layer on top of it
(rust, chipped paint, dust) are Nodes of their own, so a p per call decides how often
each layer appears. The menus here need Blender 5.
The path takes the node's name, which is not the title on the node: a group node shows its group's name, while the node itself is named e.g. "Group.004". Find the name in the Sidebar (N) > Node > Name, and rename it there (here to "Ferrous metal"), or right click an input > Copy Full Data Path. A menu input shows its current option instead of its name, so look the names up in the group's interface.
Or let the add-on write it: select the node, then Sidebar (N) > Blendmentation > Copy
Node Template > Absolute (or Node menu, right click the node, or F3). It copies a Node
with the node's path and every input, by its exact name, with the widest range the node
allows (the Min and Max of the group's inputs) and all menu options. Set the prefix to aug. in the add-on's
preferences, paste, narrow the ranges and delete the inputs to leave alone. Without the
add-on, print(aug.Node.template(ferrous_metal, prefix="aug.")) prints the same:
aug.Node('bpy.data.materials["Master material"].node_tree.nodes["Ferrous metal"]', {
    # "Texture Coordinate": connected
    "Texture ofset": aug.Vector(((75.9993, -93.0513, 48.2312), (75.9993, -93.0513, 48.2312))),  # vector, now (75.9993, -93.0513, 48.2312), no min/max
    "Base metal color": aug.Vector((0.0, 1.0)),         # color, now (0.1385, 0.1385, 0.1385, 1.0)
    "Base metal type": aug.Menu(["Shiny metal", "Cast metal"]),  # menu, now "Shiny metal"
    "Thin oxidation amount": aug.Number((0.0, 1.0)),    # float, now 0.4287
    "Texture scale": aug.Number((-10000.0, 10000.0)),   # float, now 1.0
    "Surface effect": aug.Menu(["Dotted", "Brushed", "Hammered", "Grinded", "Weathered"]),  # menu, now "Dotted"
    "Surface effect strenght": aug.Number((0.0, 1.0)),  # float, now 0.7976
    "Rust strength": aug.Number((0.0, 1.0)),            # float, now 0.0
    "Rust spread": aug.Number((0.0, 1.0)),              # float, now 0.0
    "Paint spread": aug.Number((0.0, 1.0)),             # float, now 0.0
    "Paint Color": aug.Vector((0.0, 1.0)),              # color, now (0.0009, 0.0, 0.1729, 1.0)
    "Paint disccoloration": aug.Number((0.0, 1.0)),     # float, now 0.0
    "Paint surface spots": aug.Number((0.0, 1.0)),      # float, now 0.0
    "Dust strength": aug.Number((0.0, 1.0)),            # float, now 0.0
})
Here it became four Nodes:
# the node's name, not its title
ferrous_metal = 'bpy.data.materials["Master material"].node_tree.nodes["Ferrous metal"]'

# the bare metal: in every image
base_metal = aug.Node(ferrous_metal, {
    # moves the textures: a random offset on each axis
    "Texture ofset": aug.Vector((-100, 100)),
    "Thin oxidation amount": aug.Number((0, 1)),
    # a menu: some of its options, the first two more often
    "Surface effect": aug.Menu(
        ["Weathered", "Dotted", "Hammered"],
        weights=[3, 3, 1],
    ),
    "Surface effect strenght": aug.Number((0.4, 1)),
})
# each layer on top of it is a Node of its own, so it can be left out
rust = aug.Node(ferrous_metal, {
    "Rust strength": aug.Number((0.3, 1)),
    "Rust spread": aug.Number((0.3, 1)),
})
chipped_paint = aug.Node(ferrous_metal, {
    "Paint spread": aug.Number((0.375, 0.777)),
    # any color: red, green and blue from 0 to 1, alpha kept
    "Paint Color": aug.Vector((0, 1)),
    "Paint disccoloration": aug.Number((0, 1)),
    "Paint surface spots": aug.Number((0, 1)),
})
dust = aug.Node(ferrous_metal, {
    "Dust strength": aug.Number((0, 0.7)),
})

generator = gen.Compose(
    [gen.Render()],
    path="//dataset",
    resolution=(640, 640),
)
for _ in range(100):
    # the material is set back afterwards
    with state.restoring():
        # an absolute path: no object needed
        base_metal()
        # p for this call: rust in 20% of the images, chipped paint in 80%, dust in 20%;
        # a skipped layer keeps the values saved in the scene
        rust(p=0.2)
        chipped_paint(p=0.8)
        dust(p=0.2)
        generator()
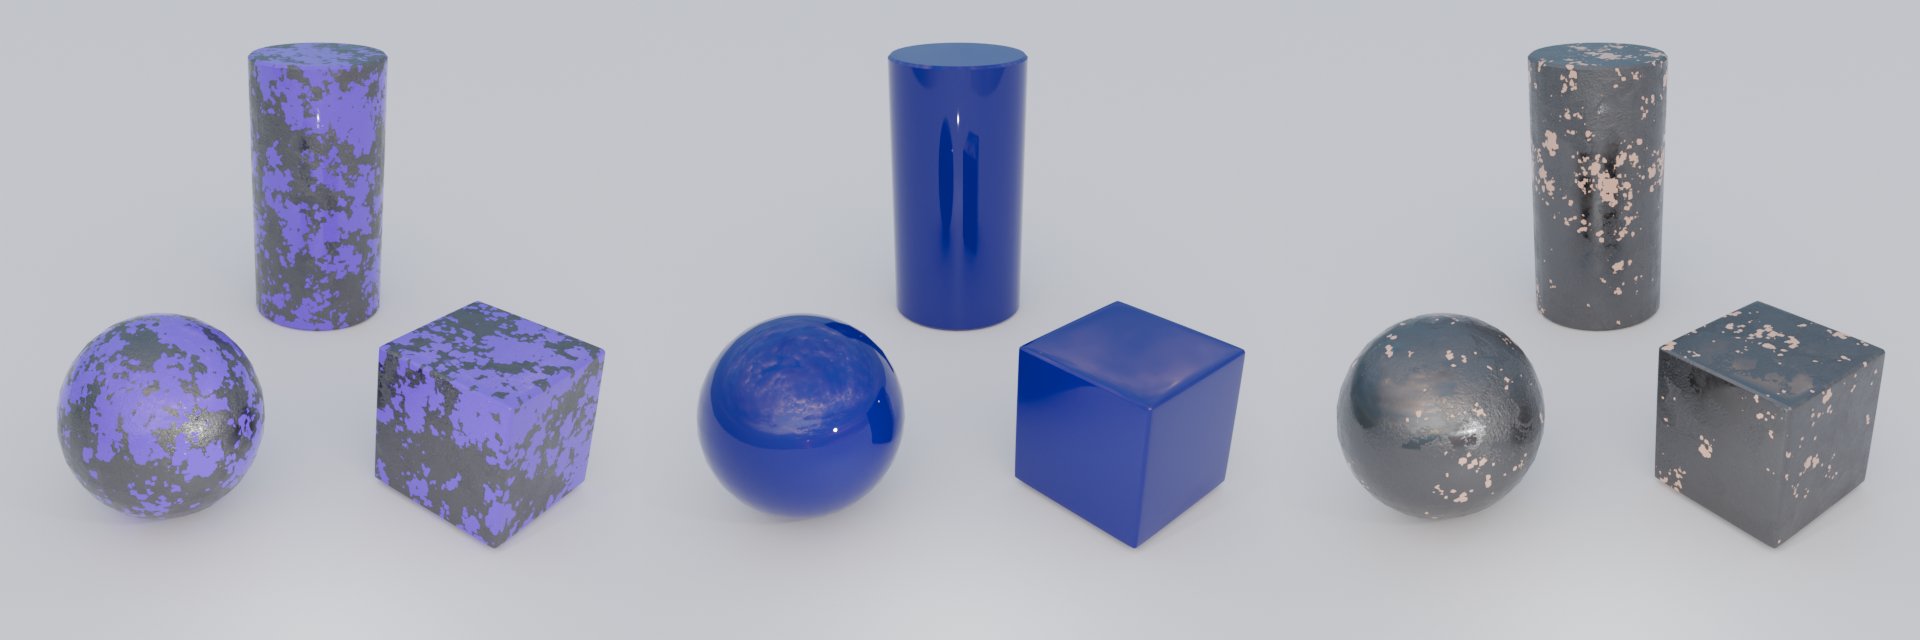
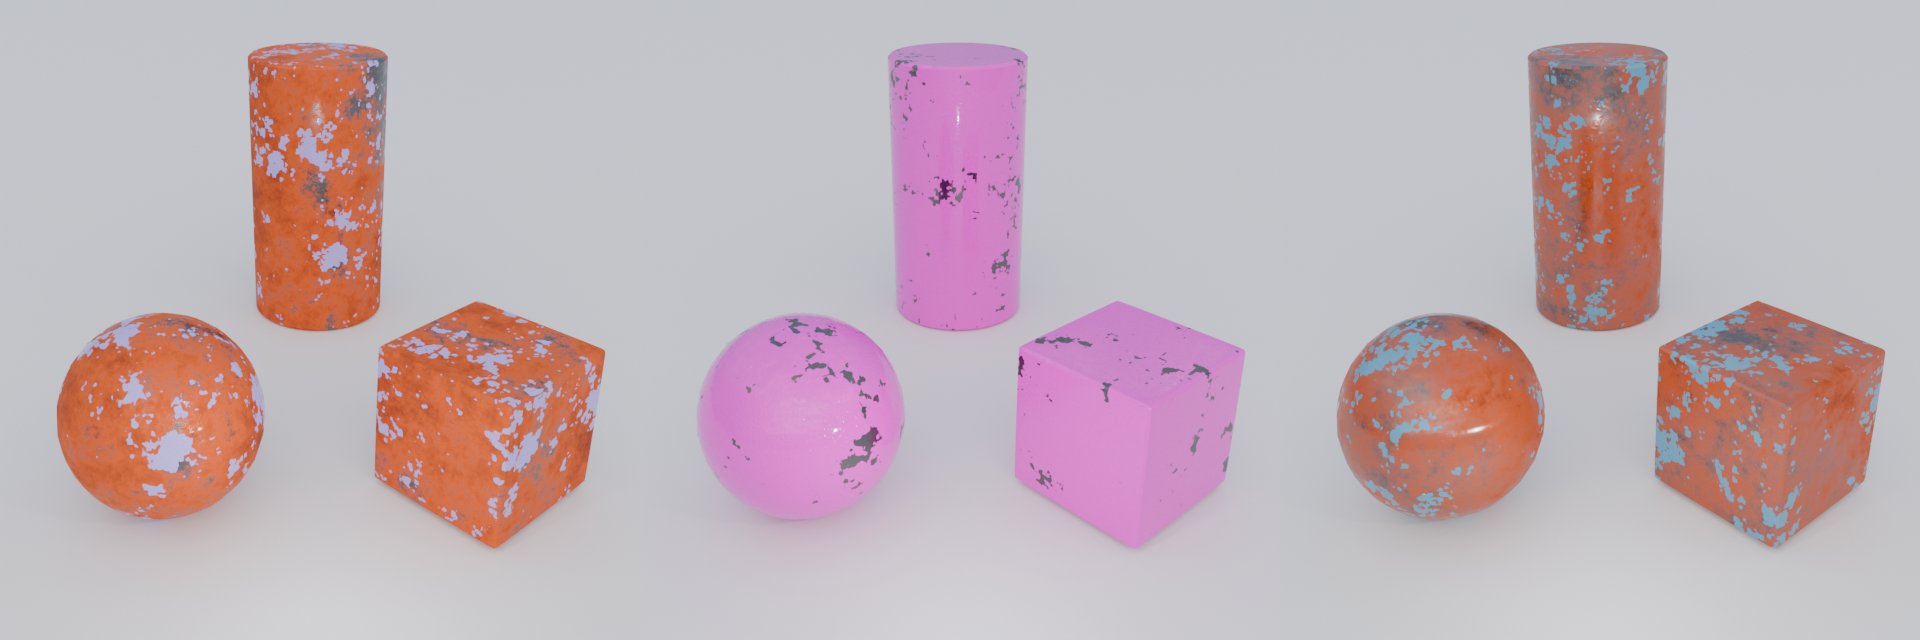
The inputs are named as in the group's interface (the node shows them shortened), and
rust.actual holds the value set to each, None when the layer was skipped. Here a
skipped layer keeps what the scene has (no rust or dust; full paint, as in the second
image); to set something else, give the inputs an otherwise, e.g.
aug.Number((0.3, 1), otherwise=0).
To give every object its own copy of the material a different look, use a path relative
to the object, 'active_material.node_tree.nodes["Ferrous metal"]', in a Compose
called with the objects. Node works the same on a group node in geometry nodes,
'bpy.data.node_groups["Scatter"].nodes["Rock generator"]', and Modifier on the inputs
of a geometry nodes modifier, 'modifiers["Scatter"]'. Each input can also be set on its
own with Number, Vector, Boolean or Menu and its data path.
HDRI world
A random HDRI, brightness and rotation for the world in every image. The world's nodes: Texture Coordinate (Generated) → Mapping → three Environment Textures with the HDRIs → a Menu Switch with the items A, B and C, one per texture → Background → World Output. A Menu Switch in shader nodes needs Blender 5. The engine is Cycles or EEVEE.
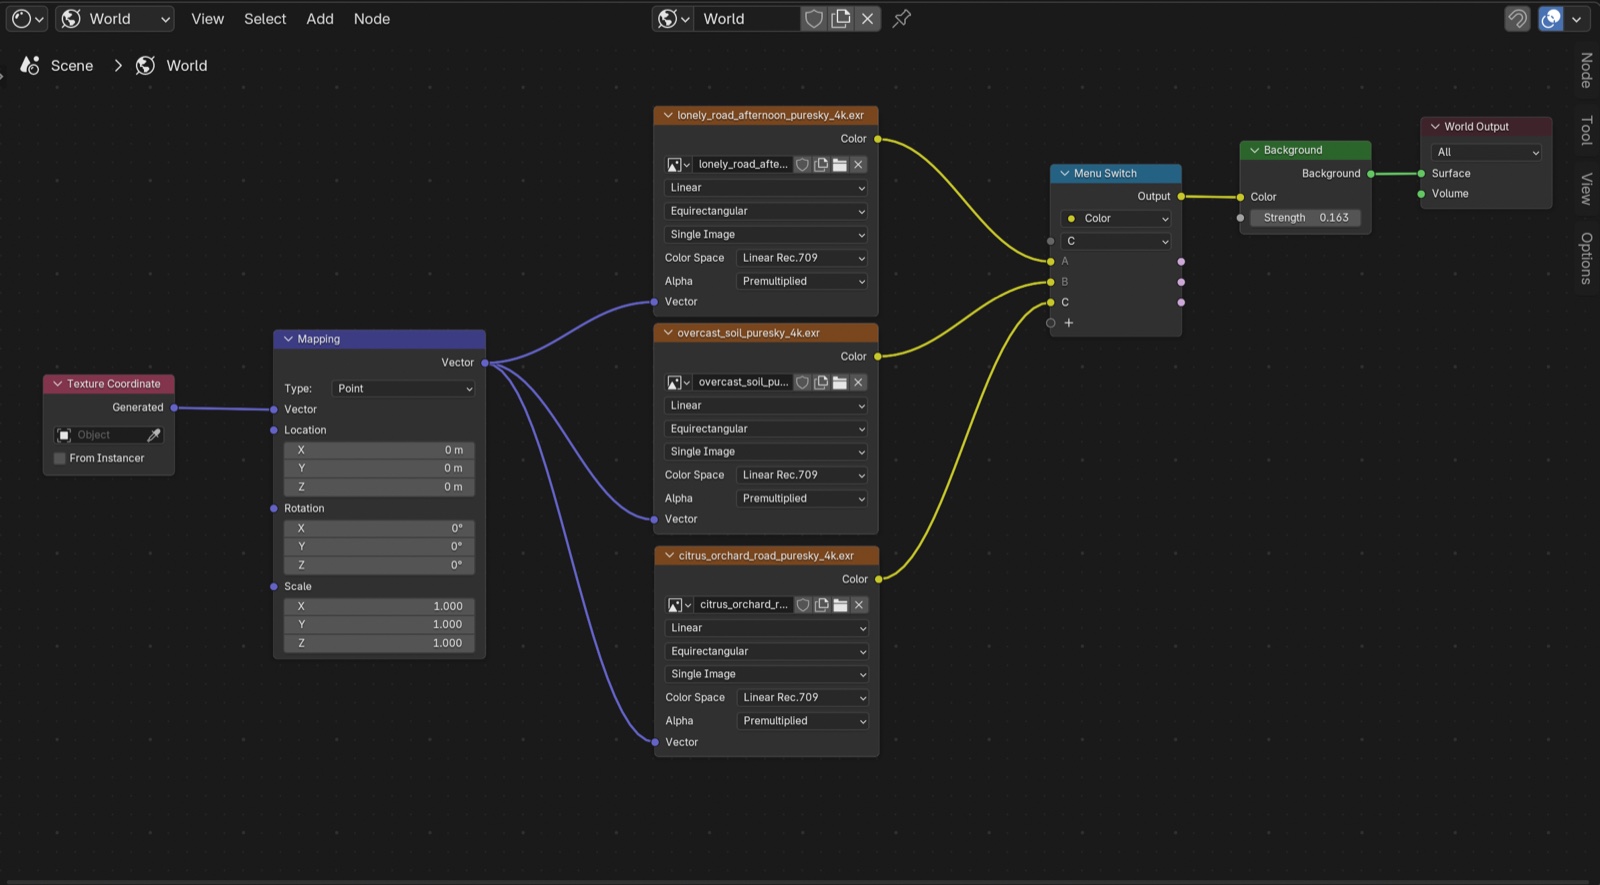
world = bpy.context.scene.world

# the paths are relative to the world
world_aug = aug.Compose([
    # HDRI: A, B or C, the options are read from the node
    aug.Menu(
        'node_tree.nodes["Menu Switch"].inputs[0].default_value',
    ),
    # strength
    aug.Number(
        'node_tree.nodes["Background"].inputs[1].default_value',
        value_range=(0, 0.3),
    ),
    # rotation around Z, in radians
    aug.Number(
        'node_tree.nodes["Mapping"].inputs[2].default_value[2]',
        value_range=(0, 6.28),
    ),
])
generator = gen.Compose(
    [gen.Render()],
    path="//dataset",
    resolution=(640, 480),
)
for _ in range(100):
    with state.restoring():
        # a world goes where the objects usually go
        world_aug([world])
        generator()
Menu takes the options from the Menu Switch; pass options=["A", "B", "C"] and
weights=[2, 1, 1] to pick some more often. With absolute paths, as Blender's Copy Full
Data Path gives them ('bpy.data.worlds["World"].node_tree.nodes["Background"].inputs[1].default_value'),
the same works.
Cluttered scene with geometry nodes
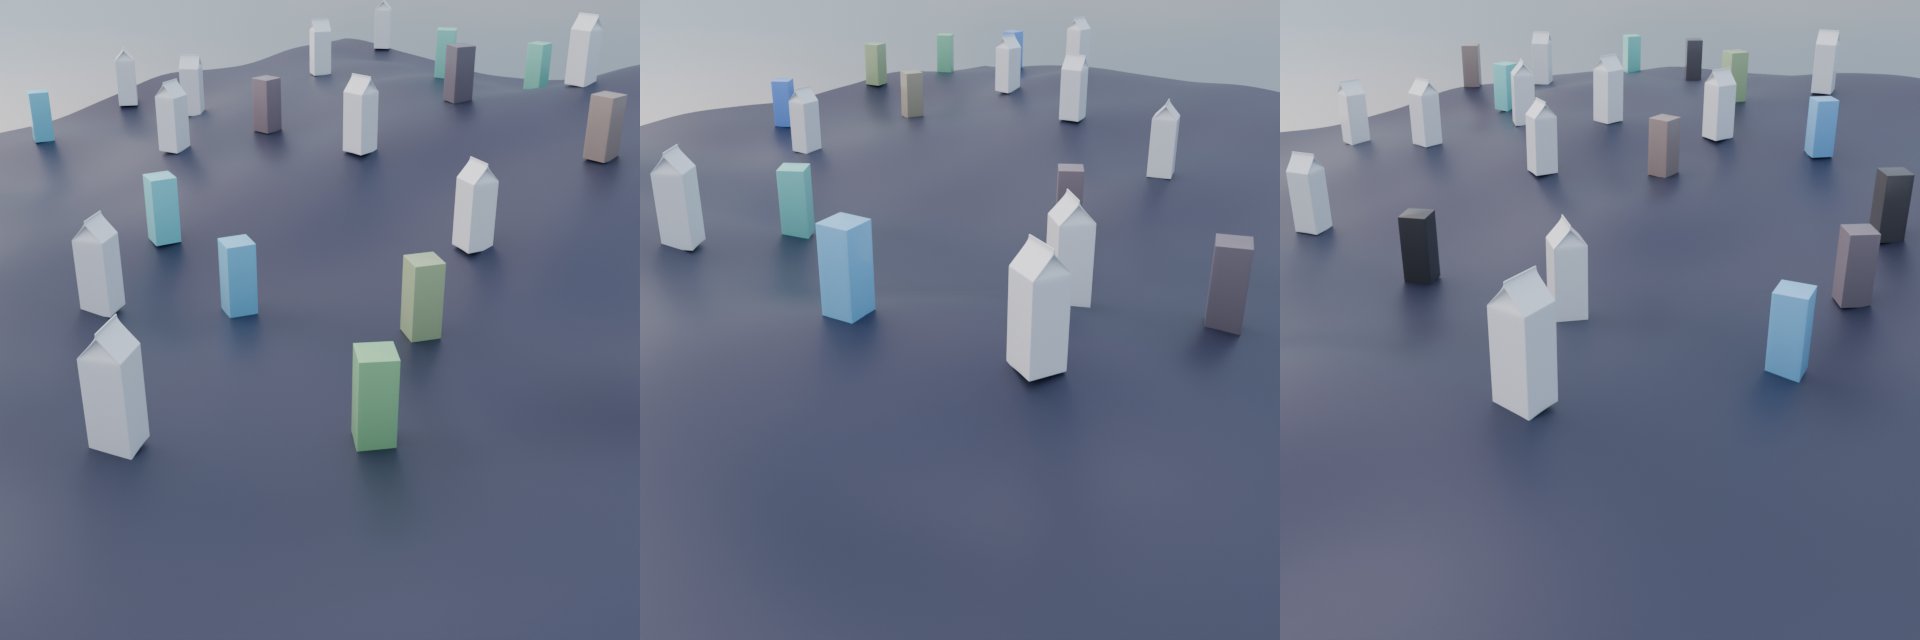
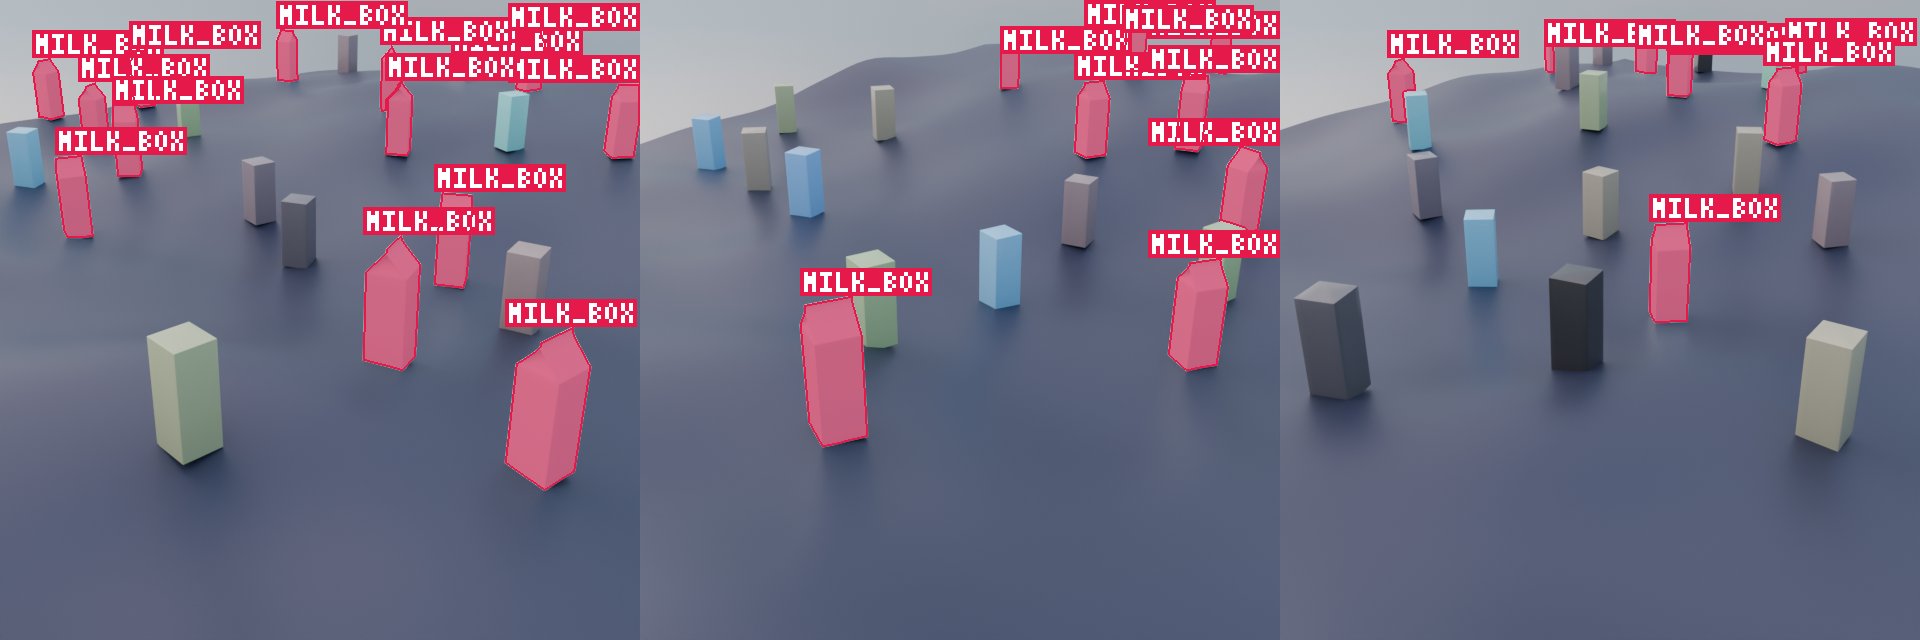
For many objects, let geometry nodes build the scene and only change their seeds. Here a geometry nodes modifier on "Floor" (node group "Geometry Nodes") displaces the floor with a Noise Texture moved by a Random Value, scatters points on it with Distribute Points on Faces (Poisson Disk), and puts a random object from a collection on each point (Collection Info with Separate Children, Instance on Points with Pick Instance), then turns each instance with another Random Value. The collection holds the milk carton "Milk Box" and colored boxes, which are clutter and get no class.
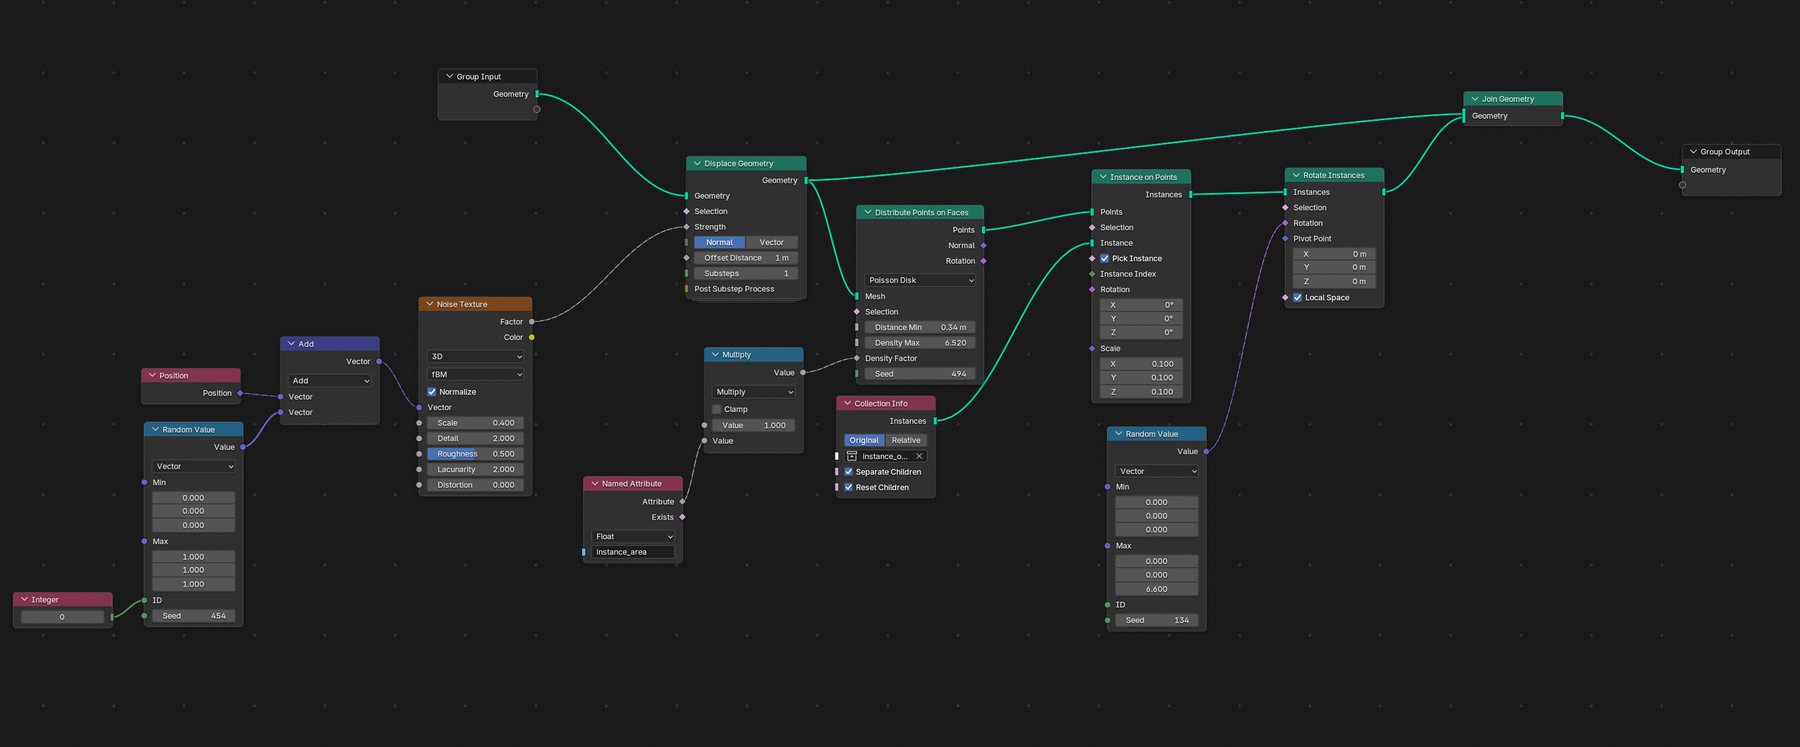
Seed gives every unlinked Seed input of the node group a new random value, so the
floor shape, the points and the rotations change together. Instances labels every milk
carton the floor's geometry nodes instance as its own instance of the class.
floor = bpy.data.objects["Floor"]
milk_box = bpy.data.objects["Milk Box"]
geo_node_tree = bpy.data.node_groups["Geometry Nodes"]

# a new random value for every seed in the node group
nodes_aug = aug.Compose([aug.Seed(geo_node_tree)])

# every milk carton instanced on the floor; the colored boxes have no class
classes = {"milk_box": [gen.Instances(floor, of=milk_box)]}

generator = gen.Compose(
    [
        gen.Render(),
        gen.Segmentation(classes),
        # a copy of the image with the masks drawn, to check them
        gen.SegmentationImage(),
    ],
    path="//dataset",
    resolution=(640, 640),
)
for _ in range(100):
    # the seeds are set back afterwards
    with state.restoring():
        # Seed ignores the object, so it runs once
        nodes_aug([floor])
        generator()
To also change the inputs shown on the modifier, add
aug.Modifier('modifiers["GeometryNodes"]', {"Density": aug.Number((5, 20))}). It finds
them by name, in every Blender version. Modifier also sets the settings of any other
modifier by their Python name, e.g.
aug.Modifier('modifiers["Subdivision"]', {"render_levels": aug.Number((1, 3))}). To
start from every input or setting with its range, select the modifier and use the
add-on's 3D viewport Sidebar (N) > Blendmentation > Copy Modifier Template, or print(aug.Modifier.template(floor.modifiers["GeometryNodes"], prefix="aug.")).
Exporting
The export functions turn the generated <index>.json labels into a standard format.
Each example here has only the generating steps that format needs; generate with the loop
from the sections above (augment and generator() inside with state.restoring():), then call the
export once on the same path. The examples use the milk carton from the first section.
COCO
Boxes and instance masks for detection and instance segmentation. With masks, the boxes are the extent of the visible pixels of each mask.
milk_box = bpy.data.objects["Milk Box"]

generator = gen.Compose(
    [
        gen.Render(),
        gen.Segmentation({"milk_box": [milk_box]}),
    ],
    path="//dataset",
    resolution=(640, 480),
)

# ... generate ...

# writes //dataset/coco.json
export.coco("//dataset")
For boxes only, use gen.BBox in place of gen.Segmentation.
YOLO
Detection boxes, a .txt file next to every image and a dataset.yaml for Ultralytics.
milk_box = bpy.data.objects["Milk Box"]

generator = gen.Compose(
    [
        gen.Render(),
        gen.BBox({"milk_box": [milk_box]}),
    ],
    path="//dataset",
    resolution=(640, 480),
)

# ... generate ...

# writes //dataset/<index>.txt, classes.txt and dataset.yaml
export.yolo("//dataset")
BBox boxes are amodal: they cover the whole object, also the parts hidden behind other
objects. A milk carton half behind a box gets a box around all of it. Most detection
datasets use modal boxes instead, around only the visible pixels. For those, generate
instance masks with Segmentation and export with bbox_from="mask": each box is then
the extent of its mask, and a fully hidden carton gets no box. BBox can stay, for its
skip settings (max_truncation, max_occlusion), but it isn't needed.
milk_box = bpy.data.objects["Milk Box"]

generator = gen.Compose(
    [
        gen.Render(),
        gen.Segmentation({"milk_box": [milk_box]}),
    ],
    path="//dataset",
    resolution=(640, 480),
)

# ... generate ...

# boxes of the visible pixels, from the masks
export.yolo("//dataset", bbox_from="mask")
Pascal VOC
Detection boxes, one XML file per image.
milk_box = bpy.data.objects["Milk Box"]

generator = gen.Compose(
    [
        gen.Render(),
        gen.BBox({"milk_box": [milk_box]}),
    ],
    path="//dataset",
    resolution=(640, 480),
)

# ... generate ...

# writes //dataset/Annotations/<index>.xml
export.voc("//dataset")
For boxes of only the visible pixels, use Segmentation and bbox_from="mask" as in
the second YOLO example.
BOP
6D poses for pose estimation. It needs the pose of every instance and the camera's
intrinsics, with a perspective camera. Every object of a class must keep the same mesh
and scale, so no Scale augmentation on it.
milk_box = bpy.data.objects["Milk Box"]

generator = gen.Compose(
    [
        gen.Render(),
        gen.Pose({"milk_box": [milk_box]}),
        gen.CameraData(),
    ],
    path="//dataset",
    resolution=(640, 480),
)

# ... generate ...

# writes //dataset/bop/train_pbr/000000
export.bop("//dataset")
For the masks and visible fractions, add
gen.Segmentation({"milk_box": [milk_box]}, full_masks=True); for depth images,
gen.Passes(["Depth"]) with Cycles or EEVEE. The 3D model of each class
(models/obj_<obj_id>.ply, in mm) is not written; export it from Blender.
Merging runs
With a prefix, every file of a run starts with it, and the indices count per prefix.
Runs on other machines, or with other scenes or settings, can then write to one folder,
or be copied into one later, without overwriting each other. The exports read every
prefix and number the images in order.
generator = gen.Compose(
    [gen.Render(), gen.BBox(classes)],
    path="//dataset",
    prefix="run1_",  # run1_000000.png, run1_000000.json, ...
    resolution=(640, 480),
)

# ... generate, and copy the other runs' files into //dataset ...

# all runs together
export.coco("//dataset")
export.augmentation_report, augmentation_stats and skip_stats take the prefix
of one run, since each run has its own augmentation graph (run1_augmentations.json).
Full example
The scene here has two cars and a table made of two objects, a plant "Plant" that is in no class and may hide them (with a few materials in its slots, a few UV maps and a Subdivision Surface modifier "Subdivision"), a floor "Floor" with pebbles scattered on it by a geometry nodes group "Scatter" in a modifier "Scatter" on the floor (instances of the objects of a collection "Pebbles", from a Collection Info node, without random scale; a float input "Density" sets how many), a point light, a camera and a curve "CameraPath" around the cars for the camera to ride on (e.g. a Bezier circle). The cars use the material "CarPaint". The engine is Cycles or EEVEE, with a shader AOV "Albedo" in View Layer Properties → Passes → Shader AOV. The render is transparent (Render Properties → Film → Transparent, RGBA output), and a folder "backgrounds" with photos is next to the .blend file.
car_1 = bpy.data.objects["Car.001"]
car_2 = bpy.data.objects["Car.002"]
table = [bpy.data.objects["TableTop"], bpy.data.objects["TableLegs"]]
plant = bpy.data.objects["Plant"]
floor = bpy.data.objects["Floor"]
lamp = bpy.data.objects["Light"]
camera = bpy.context.scene.camera
camera_path = bpy.data.objects["CameraPath"]
scatter = bpy.data.node_groups["Scatter"]
pebbles = bpy.data.collections["Pebbles"]

# 1. augmentations, applied to every object in the list
keep_above = aug.KeepAbove(floor, margin=0.01)
objects_aug = aug.Compose([
    aug.Translation(x=0.5, y=0.5),
    aug.Rotation(z=180),
    aug.SimpleMaterial(
        "CarPaint",
        hue=(0, 1),
        saturation=(0.5, 1),
        roughness=(0.1, 0.6),
    ),
    # more inputs of the same material, each its own way; to start from every input with
    # its range: the add-on's Sidebar > Blendmentation > Copy Node Template > Relative, or
    # print(aug.Node.template(car_1.active_material.node_tree.nodes["Principled BSDF"], car_1, prefix="aug.", relative=True))
    # the shape keys of the car (none here), to start from every one: the add-on's
    # 3D viewport Sidebar > Blendmentation > Copy Shape Keys Template > Relative, or
    # print(aug.Chain.shape_keys_template(car_1, prefix="aug."))
    aug.Node(
        'active_material.node_tree.nodes["Principled BSDF"]',
        {
            # (low, high, step): 0, 0.1, ... 0.5
            "Coat Roughness": aug.Number((0, 0.5, 0.1)),
            # a clear coat on 30% of the cars, none on the others
            "Coat Weight": aug.Number((0.5, 1), p=0.3, otherwise=0),
        },
        # any augmentation can take a name, shown in the
        # graph and in export.augmentation_report
        name="clear coat",
    ),
    # after the transforms: lifts the cars out of the floor
    keep_above,
])
lamp_aug = aug.Compose([
    # a new brightness, or half as often a dim warm light
    aug.OneOf(
        [
            aug.Number("data.energy", value_range=(600, 1400)),
            # a whole list, applied as one augmentation
            aug.Chain([
                aug.Number("data.energy", value_range=(300, 600)),
                aug.Vector(
                    "data.color",
                    value_range=((1, 0.7, 0.5), (1, 0.85, 0.7)),
                ),
            ]),
        ],
        weights=[2, 1],
    ),
    aug.Menu("data.type", options=["POINT", "SPOT"]),
    aug.Boolean("data.use_shadow", p=0.8),
])
plant_aug = aug.Compose([
    # in the render 70% of the time, labels follow
    aug.Visibility(p=0.7),
    # one of the materials in its slots
    aug.MaterialSlot(),
    # textures laid out by one of its UV maps
    aug.UVMap(),
    # only half of the time; BOP needs fixed-size cars
    aug.Scale(x=10, y=10, z=10, p=0.5),
    # one of 8 headings, 45 degrees apart: (low, high, step)
    aug.Rotation(z=(0, 315, 45)),
    # any modifier's settings, by their Python name: rounded or blocky leaves
    aug.Modifier('modifiers["Subdivision"]', {
        "subdivision_type": aug.Menu(["CATMULL_CLARK", "SIMPLE"]),
    }),
])
# the inputs shown on the floor's geometry nodes modifier, by name; to start from every
# input: Sidebar > Blendmentation > Copy Modifier Template, or
# print(aug.Modifier.template(floor.modifiers["Scatter"], prefix="aug."))
floor_aug = aug.Compose([
    aug.Modifier(
        'modifiers["Scatter"]',
        {"Density": aug.Number((5, 20))},
    ),
    # in Cycles, a third of the time only the shadows on the
    # floor are rendered, over the background
    aug.ShadowCatcher(p=0.3),
])
# a new random value for every seed in the node group
scatter_seed = aug.Seed(scatter)
# with data_path an object augmentation always changes that object, so it also runs
# alone: the light moves a little on top of lamp_aug
lamp_shift = aug.Translation(x=0.3, y=0.3, data_path='bpy.data.objects["Light"]')
camera_aug = aug.Compose([
    # around the cars, or a third of the time on the path
    aug.OneOf(
        [
            aug.LookAt(
                [car_1, car_2],
                distance=(6, 12),
                elevation=(10, 45),
                azimuth=(0, 360),
            ),
            aug.Chain([
                # a random point along the curve
                aug.PlaceOnCurve(camera_path),
                # off the path, a little up or down
                aug.Translation(z=(-0.3, 0.3)),
                # no distance: keeps the point, only aims
                aug.LookAt([car_1, car_2]),
            ]),
        ],
        weights=[2, 1],
    ),
    # a dolly zoom; size: the cars end up 80 to 120 % of the size they had before
    aug.FocalLength((24, 85), target=[car_1, car_2], keep_size=True, size=(80, 120)),
    # blurred in half of the images, sharp in the others; focused up to 10 % in
    # front of or behind the car, like a Translation offset
    aug.DepthOfField(car_1, f_stop=(1.4, 5.6), defocus=10, p=0.5, otherwise=False),
])

# 2. what to save for every datapoint
classes = {
    "car": [car_1, car_2],
    # wins over the BBox argument
    "table": {"instances": [table], "max_truncation": 0.8},
    # every pebble the floor's geometry nodes scatter, overlapping,
    # cut by the frame or hidden by the cars as they come
    "pebble": {
        "instances": [gen.Instances(floor, of=pebbles)],
        "iou_deconflict": None,
        "max_truncation": None,
        "max_occlusion": None,
    },
}
steps = [
    gen.Render(),
    # random background behind the render
    gen.Background(
        weights={
            "color": 1,
            "white_noise": 1,
            "color_noise": 1,
            "image": 2,
        },
        images_path="//backgrounds",
    ),
    gen.AOVToImage(["Albedo"]),
    gen.Passes(["Depth", "Normal"]),
    gen.BBox(
        classes,
        iou_deconflict=0.5,
        max_truncation=0.3,
        max_occlusion=0.5,
        allow_empty=True,  # instances out of view don't count
    ),
    # copy of the image with the boxes drawn, to check them
    gen.BBoxImage(),
    gen.Segmentation(
        classes,
        per="both",
        skip_empty=True,  # no file for empty masks
        full_masks=True,  # + masks ignoring occlusion, for BOP
    ),
    # copy of the image with the masks drawn
    gen.SegmentationImage(),
    # 6D pose of every instance, OpenCV camera axes
    gen.Pose(classes),
    gen.CameraData(),
    gen.Keypoints({"car_1": car_1, "car_1_corner": (car_1, 0)}),
    gen.OutputField("light_energy", 'bpy.data.lights["Light"].energy'),
    # what each augmentation did, per object; their graph,
    # with probabilities, goes to augmentations.json
    gen.Augmentations({
        "objects": objects_aug,
        "camera": camera_aug,
    }),
]
# prefix: every file starts with it, so runs can be merged
generator = gen.Compose(
    steps, path="//dataset", resolution=(640, 480), prefix="run1_"
)

# the graph of the augmentations, before generating;
# show=True opens it in the browser
aug.graph_preview(
    {"objects": objects_aug, "camera": camera_aug},
    "//dataset",
)

for _ in range(1000):
    # 3. everything changed inside is set back afterwards
    with state.restoring():
        objects_aug([car_1, car_2])
        # the whole Compose 70% of the time
        lamp_aug([lamp], p=0.7)
        plant_aug([plant])
        camera_aug([camera])
        floor_aug([floor])
        # a call can take p: new pebbles 90% of the time
        scatter_seed(p=0.9)
        # data_path: no object needed
        lamp_shift()
        # extra label key: how far each car was lifted
        generator({"lift": keep_above.results})

# 4. training-ready annotations
export.coco("//dataset")
# boxes of the visible pixels, from the masks
export.yolo("//dataset", bbox_from="mask")
# 6D pose: poses, masks, depth
export.bop("//dataset")
# how often each augmentation ran, against the graph
stats = export.augmentation_stats("//dataset", prefix="run1_")
for node_id, node in stats.items():
    print(node_id, node["type"], node["expected"], node["observed"])
# why BBox skipped datapoints, by reason and class
print(export.skip_stats("//dataset", prefix="run1_"))
# the same drawn: dataset/run1_augmentations.html
export.augmentation_report("//dataset", prefix="run1_")